

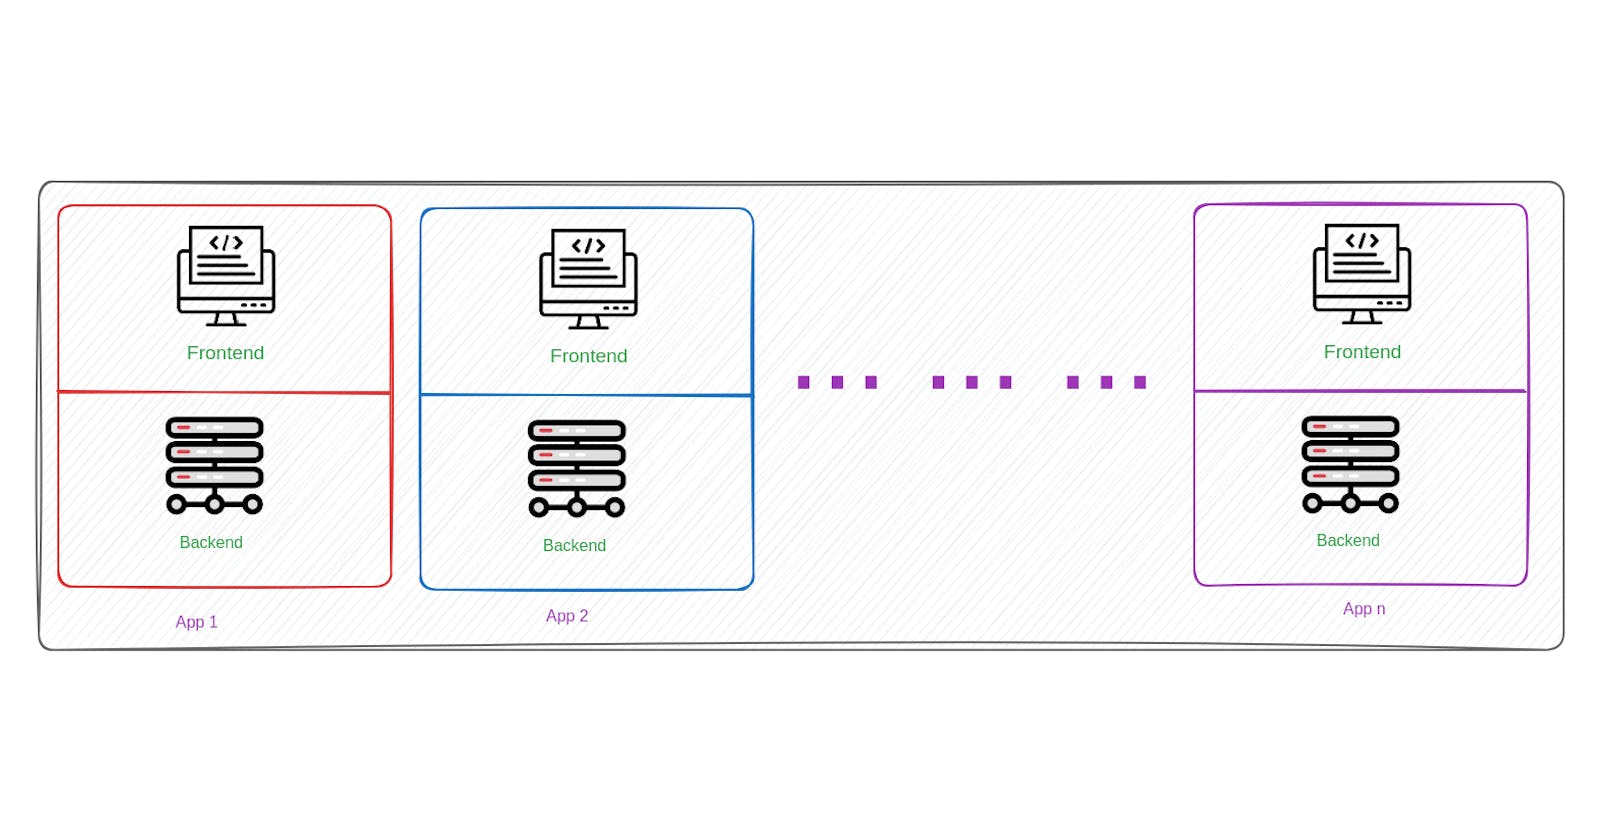
This process will support not only MERN apps but also any applications. But there will be details instructions for MERN. There are many ways to deploy multiple applications in a single VPS. For example, we can create subdomains, point them to the VPS, and configure nginx to serve different applications for different subdomains. But, we will not take that approach here. Instead, we will use a single domain and configure Nginx to serve an application for a URL and a different app for another URL. For example, yourdomain.com/project1 will serve project1 and yourdomain.com/project2 will serve project2. There are not too many prerequisites. You just need a VPS with any LTS version of Ubuntu installed. You can connect your domain to your VPS and install an SSL certificate but these are not necessary to be able to do the deployment.
How would it work?
We are going to use docker to do the task. This way the applications will have their private file system, database, and everything else. One application will not bother another. Don't be afraid if you don't know anything about docker. It'll be smooth as butter. Let's take a look at a diagram and see how it would work.
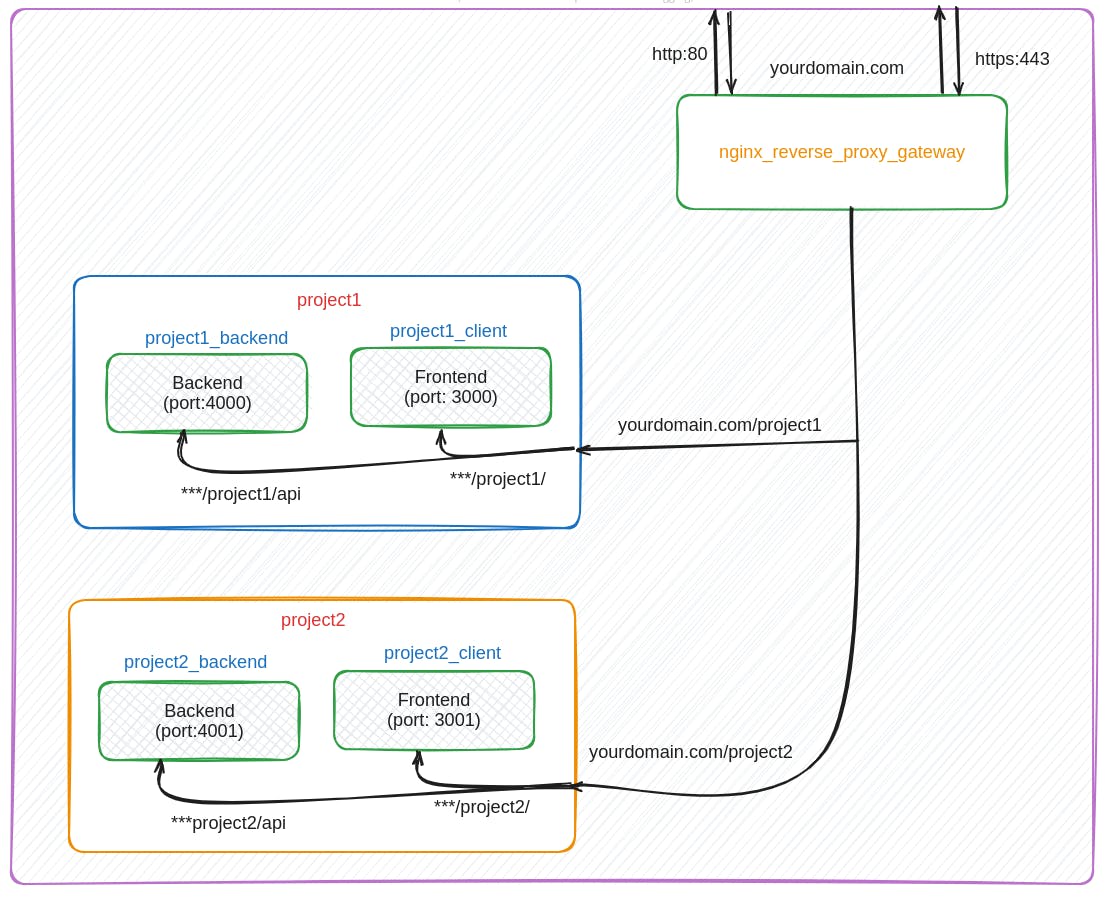
We will not install Nginx directly in our VPS. Instead, we will be using a docker container with nginx which will handle all the requests. The frontends and backends of each project will have their containers. Any request to our server will go directly to our nginx_reverse_proxy_gateway container and it'll decide which part of which app should handle that request. It's that much simple. Let's see the process in detail.
Step1: Installing docker in your VPS
Installing the docker engine to a VPS is fairly simple. You just have to follow the commands below. Make sure the docker-compose command works before proceeding to the next step of the tutorial.
First, update your existing list of packages:
sudo apt update
Next, install a few prerequisite packages that let apt use packages over HTTPS:
sudo apt install apt-transport-https ca-certificates curl software-properties-common
Then add the GPG key for the official Docker repository to your system:
curl -fsSL https://download.docker.com/linux/ubuntu/gpg | sudo gpg --dearmor -o /usr/share/keyrings/docker-archive-keyring.gpg
Add the Docker repository to APT sources:
echo "deb [arch=$(dpkg --print-architecture) signed-by=/usr/share/keyrings/docker-archive-keyring.gpg] https://download.docker.com/linux/ubuntu $(lsb_release -cs) stable" | sudo tee /etc/apt/sources.list.d/docker.list > /dev/null
Update your existing list of packages again for the addition to be recognized:
sudo apt update
Install docker and docker-compose
sudo apt install docker-ce docker-compose
If you want to avoid typing sudo whenever you run the docker command, add your username to the docker group:
sudo usermod -aG docker ${USER}
su - ${USER}
You will be prompted to enter your user’s password to continue.
Congratulations!! you've successfully installed docker on your machine.
Step2: Dockerizing MERN apps
We've successfully installed Docker on our machine. Now, we have to dockerize our MERN apps properly. I've created a repository where you can find fully configured MERN apps for both development and production environments. Let's start by cloning the repo.
https://github.com/asibulhasanshanto/deploy_multiple_mern_in_single_vps
after cloning the repo, you'll find 3 folders named nginx_rp_gateway, project1, and project2. Let's take a look at the project1 and ignore the other 2 folders for now.
There are 2 files inside the project1 folder for docker. One is docker-compose.yml and another is the docker-compose.prod.yml. We need the second one to run the project in production. Let's open the file.
version: "3.8"

services:
  mongodb_project1:
    image: mongo
    container_name: mongodb_project1
    restart: always
    ports:
      - "27017:27017"
    volumes:
      - project1:/data/db

  project1_backend:
    build:
      dockerfile: Dockerfile
      context: ./backend
    container_name: project1_backend
    hostname: project1_backend
    restart: always
    ports:
      - "4000:4000"
    env_file:
      - ./backend/src/.env
    volumes:
      - ./backend:/backend
      - /backend/node_modules

  project1_client:
    build:
      dockerfile: Dockerfile
      context: ./client
    container_name: project1_client
    hostname: project1_client
    ports:
      - "3000:3000"
    env_file:
      - ./client/.env
    volumes:
      - ./client:/client
      - /client/node_modules
    environment:
      - CHOKIDAR_USEPOLLING=true
    depends_on:
      - project1_backend
volumes:
  project1:

networks:
  default:
    name: nginx_reverse_proxy_gateway
    external: true
The first service is for Mongodb and each of our apps will have its own database services. Then we have the project1_backend container which will be our backend of the project1. It is running on port 4000 and similarly, the client is running on port 3000. If we have multiple projects then we must name the containers in a way that the names do not conflict. We will be using port 4001 for the backend and 3001 for the front end of project2. Make sure you have the Dockerfile, Dockerfile.dev and nginx.conf file in the client folder of the project1 or 2. Similarly, you should have the Dockerfile and the Dockerfile.dev in the backend folder.
Here, we need to adjust some small details for a MERN app to run the project properly in production.
you must put the correct URL of the backend in your react project's .env file.
VITE_PUBLIC_REACT_APP_API_URL=http://yourdomainname.com/project1/apiyou must add this line to the package.json file of the react app to load the frontend assets properly.
"homepage": "https://yourdomainname.com/project1",The database URL for the backend should look like this if you want to use Mongodb locally.
DATABASE_URL = mongodb://mongodb_project1:27017/project1We used the hostname for the database URL mongodb_project1 because we named the container hostname mongodb_project1
Step 3: Creating the Nginx Reverse Proxy gateway and Deployment
This is the most important part of the total configuration. You can find a folder named nginx_rp_gateway inside the folder you cloned earlier. Let's open it and try to understand it.
We have another docker-compose.yaml file here. It looks like this.
version: "3.8"

services:
  nginx-rp-gateway:
    container_name: nginx-rp-gateway
    hostname: nginx-rp-gateway
    image: nginx:1.16.0
    ports:
      - 80:80
      - 443:443
    volumes:
      - ./conf:/etc/nginx/conf.d/
      - ./html/index.html:/var/www/html/index.html
      - /etc/letsencrypt:/etc/letsencrypt
networks:
  default:
    name: nginx_reverse_proxy_gateway
This container will run an Nginx image which will listen to any request coming to ports 80 and 443 of the VPS. Here, we have a default network named nginx_reverse_proxy_gateway. Make sure this name matches the external default network name of the docker-compose.prod.yml file of project1 and project2. Otherwise, the projects will not be able to find the network.
If you did not install the SSL certificate then comment/remove the line
- /etc/letsencrypt:/etc/letsencrypt and - 443:443
Now, If we open the conf/site.conf file, we can see this.
upstream project1_server {
        server project1_backend:4000;
}

upstream project1_client {
        server project1_client:3000;
}
upstream project2_server {
        server project2_backend:4001;
}

upstream project2_client {
        server project2_client:3001;
}

server {

        listen 80;
        listen [::]:80;
        listen 443 ssl;

        ssl_certificate /etc/letsencrypt/live/yourdomainname.com/fullchain.pem; # managed by Certbot
        ssl_certificate_key /etc/letsencrypt/live/yourdomainname.com/privkey.pem; # managed by Certbot
        include /etc/letsencrypt/options-ssl-nginx.conf; # managed by Certbot
        ssl_dhparam /etc/letsencrypt/ssl-dhparams.pem; # managed by Certbot

        root /var/www/html;
        index index.html index.htm ;

        server_name  yourdomainname.com www.yourdomainname.com;

        location / {
                try_files $uri $uri/ /index.html;
        }

        location /project1  {
                proxy_headers_hash_max_size 512;
                proxy_headers_hash_bucket_size 64;
                proxy_set_header Host $host;
                proxy_set_header X-Forwarded-Proto $scheme;
                proxy_set_header X-Real-IP $remote_addr;
                proxy_set_header X-Forwarded-For $proxy_add_x_forwarded_for;
                add_header Front-End-Https on;

                proxy_pass http://project1_client/;

               location /project1/api/ {
                         proxy_headers_hash_max_size 512;
                         proxy_headers_hash_bucket_size 64;
                         proxy_set_header Host $host;
                         proxy_set_header X-Forwarded-Proto $scheme;
                         proxy_set_header X-Real-IP $remote_addr;
                         proxy_set_header X-Forwarded-For $proxy_add_x_forwarded_for;

                        proxy_pass http://project1_server;
                }

        }
        location /project2  {
                proxy_headers_hash_max_size 512;
                proxy_headers_hash_bucket_size 64;
                proxy_set_header Host $host;
                proxy_set_header X-Forwarded-Proto $scheme;
                proxy_set_header X-Real-IP $remote_addr;
                proxy_set_header X-Forwarded-For $proxy_add_x_forwarded_for;
                add_header Front-End-Https on;

                proxy_pass http://project2_client/;

               location /project2/api/ {
                         proxy_headers_hash_max_size 512;
                         proxy_headers_hash_bucket_size 64;
                         proxy_set_header Host $host;
                         proxy_set_header X-Forwarded-Proto $scheme;
                         proxy_set_header X-Real-IP $remote_addr;
                         proxy_set_header X-Forwarded-For $proxy_add_x_forwarded_for;

                        proxy_pass http://project2_server;
                }

        }

}
Here, we have 4 upstreams at the top. These are pointing to the docker containers of our project1 and the project2.
For example, the upstream project1_server has the Server(which will be the same as the container hostname) project1_backend and it is running on port 4000. All the backends and frontends of our projects should have an upstream like this.
Make sure to comment/remove the listen 443 ssl; line and the following 4 lines which are managed by certbort if you did not install the SSL certificate on your VPS.
In the Server block, we have our normal configuration of an Nginx server. The magic happens in the location /project1 block. Whenever a request comes to the URL yourdomain.com/project1, this block of code is responsible for handling that task. Inside this block, we have some header configurations at the beginning. Then, we have the line proxy_pass project1_client; This line directs the request to the project1_server upstream and then it goes to the respective container, and the client app is served. Similarly, we have another location inside project1 which is /project1/api/. Whenever a request comes to the URL yourdomain.com/project1/api, the request comes to this block and goes to the backend of project1 by the proxy_pass project1_server; similarly as described before.
In this way, we can add as many MERN or other applications as we want. The project2 is also served in exactly a similar way as the project1. So, now the question is,
how do we run these containers?
we have to run the nginx-rp-gateway container at first. To run this container, go the the nginx_rp_gateway folder by doing cd nginx_rp_gateway from the folder you cloned earlier and then run the following command,
docker compose up -dIt will be failed the first time. But, the network nginx_reverse_proxy_gateway will be created and it is necessary to run the other containers.
Now go to the project1 and project2 folder respectively and run the following command.
docker compose -f docker-compose.prod.yml up -d --buildIt'll build the containers and run them on the required ports.
Then again go to the nginx-rp-gateway folder and run
docker compose downIt'll remove the nginx-rp-gateway container which is not running properly yet but keep the network. Now again run
docker compose up -dThis time the container will run perfectly and just go to yourdomain.com/project1 or yourdomain.com/project2 to see your projects.
Congratulations!!!!!
you've done it.
Now few things to remember. Make sure you've deleted all the cache of docker if you have to change any code and run the containers again during the deployment process. Otherwise, it'll be very painful to debug what went wrong. You can upload a static site in the html folder inside the nginx_rp_gateway folder which will be served upon going to the yourdomain.com. Use your domain or the IP address of your VPS in place of yourdomain.com if you do not have a domain name yet. The last and important is, If your VPS does not have enough RAM to build the projects, try to build them on your local machine, upload the dist folder to git, and remove the building process from docker in production.
I've uploaded my projects in this way to my VPS and you can find them live here. I've put a little bit of extra time into figuring out how it works and took help from this blog which was not fully explained and decided to write so that you don't have to waste your time. Thanks to the person who wrote that blog, otherwise It might take more time and effort.